
Guide contents
Field-ready coating tools
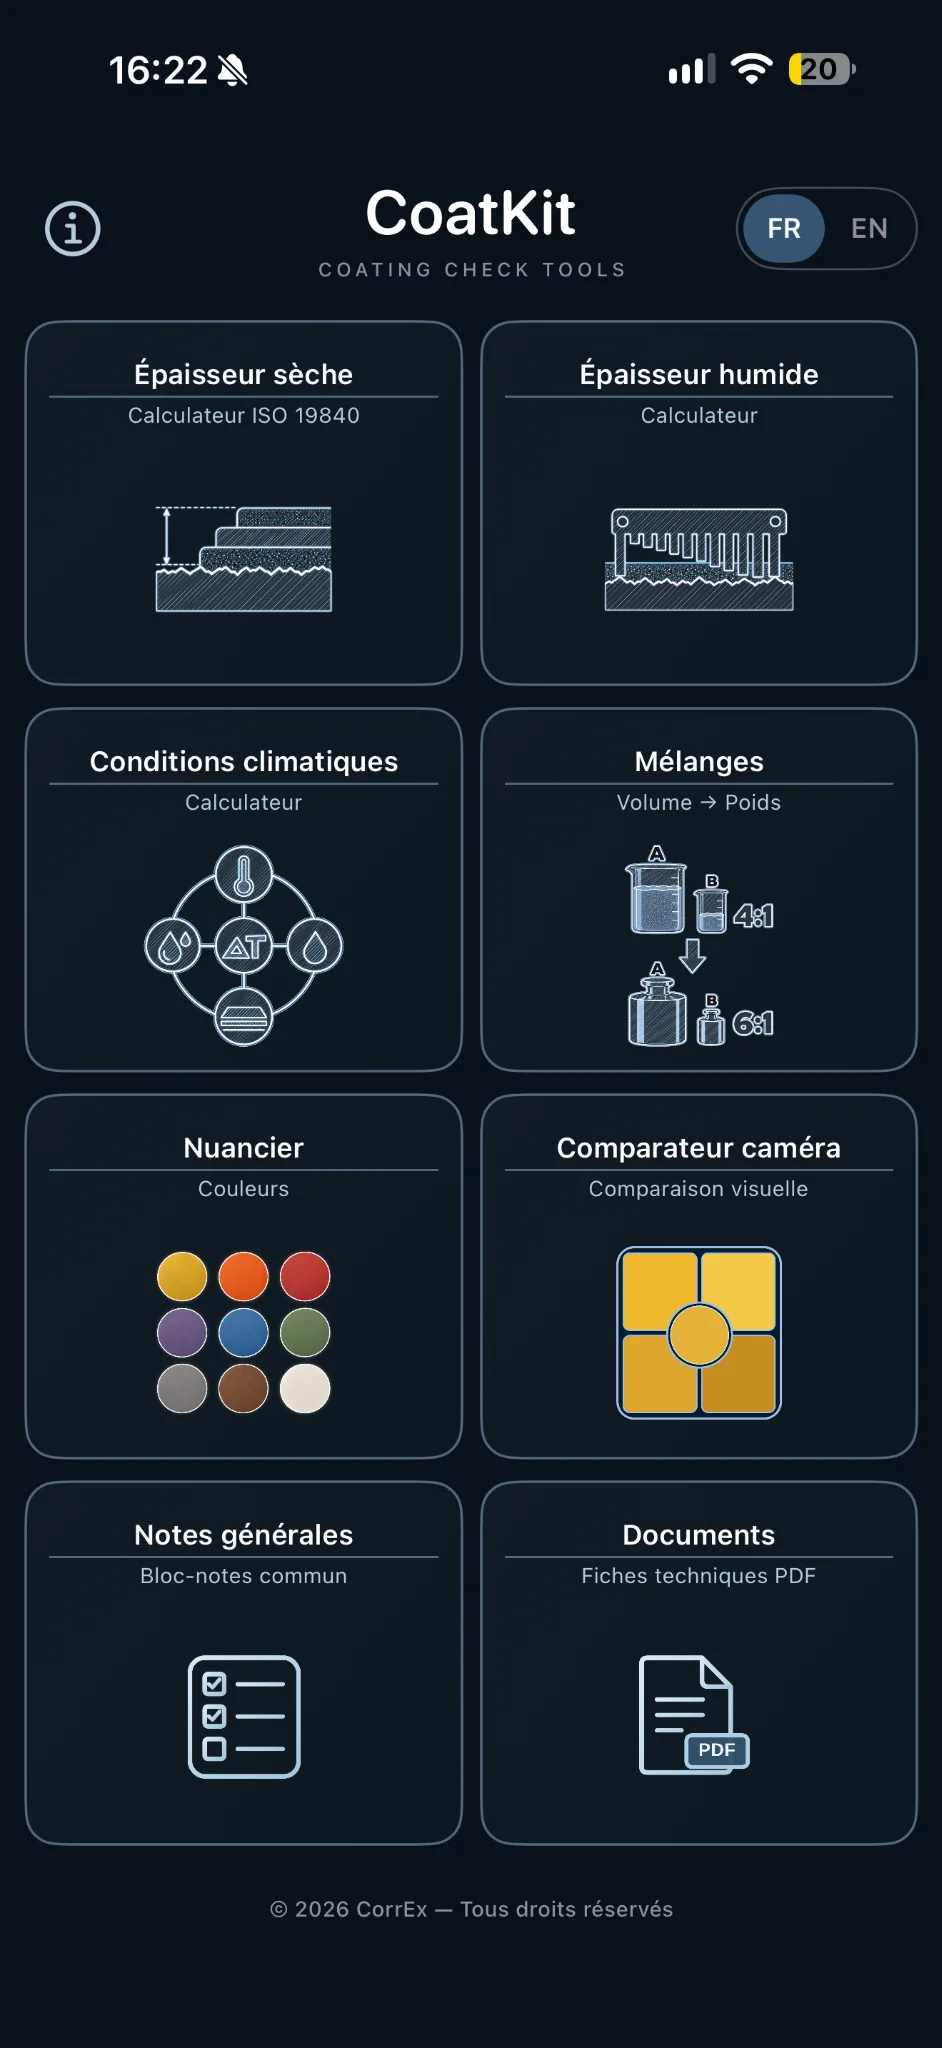
CoatKit is a free toolkit for coating inspection tasks. The home screen now includes eight modules: Dry Film Thickness, Wet Film Thickness, Climatic Conditions, Mixing, Colour Chart, Camera Comparison, General Notes and Documents. Projects share data between DFT and WFT.
Shared projects in DFT and WFT
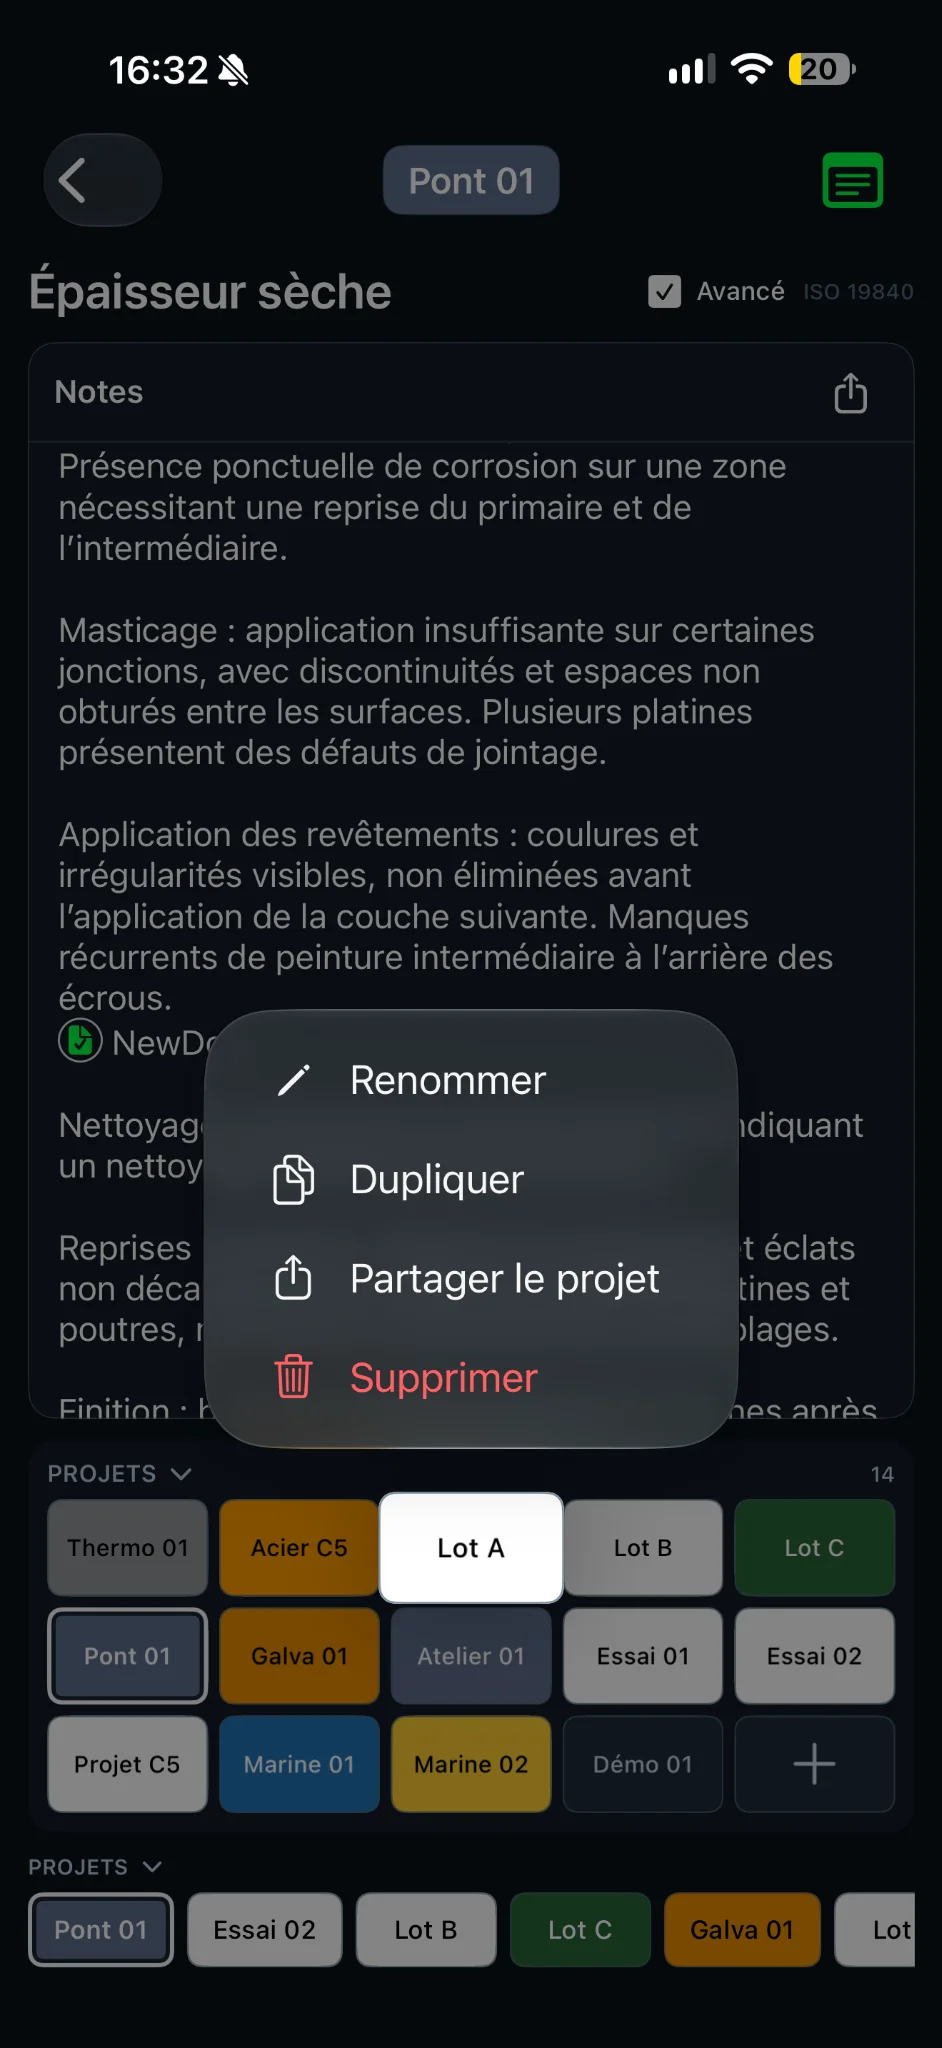
The active project name appears at the top of both DFT and WFT. Recent projects appear below; tap a project to switch or expand the Projects drawer to see the full grid. Each project stores its own coats, notes, settings and linked documents. Touch and hold a project to open management actions.
Use the .coatkit export in Information to back up your entire CoatKit data, including documents and general notes. To share just one project, use “Share project” to create a .coatproj file; see the project transfer section.
Dry film thickness · DFT
Prepare minimum, nominal and maximum film thickness limits for individual coats and coating systems, taking surface profile correction into account.
Tap a recent project at the bottom, or use the Projects drawer. The active name is displayed at the top.
In Advanced mode, each C1, C2, C3… tab stores its coat’s Min, Nominal and Max values. Simple mode is intended for an overall calculation with a single nominal DFT.
Select Fine (10 µm), Medium (25 µm) or Coarse (40 µm), according to the applicable inspection procedure.
The table displays limits for the coating system, distinguishing uncorrected readings (light grey) from corrected-reading thresholds (yellow). The diagram illustrates the coat stack.
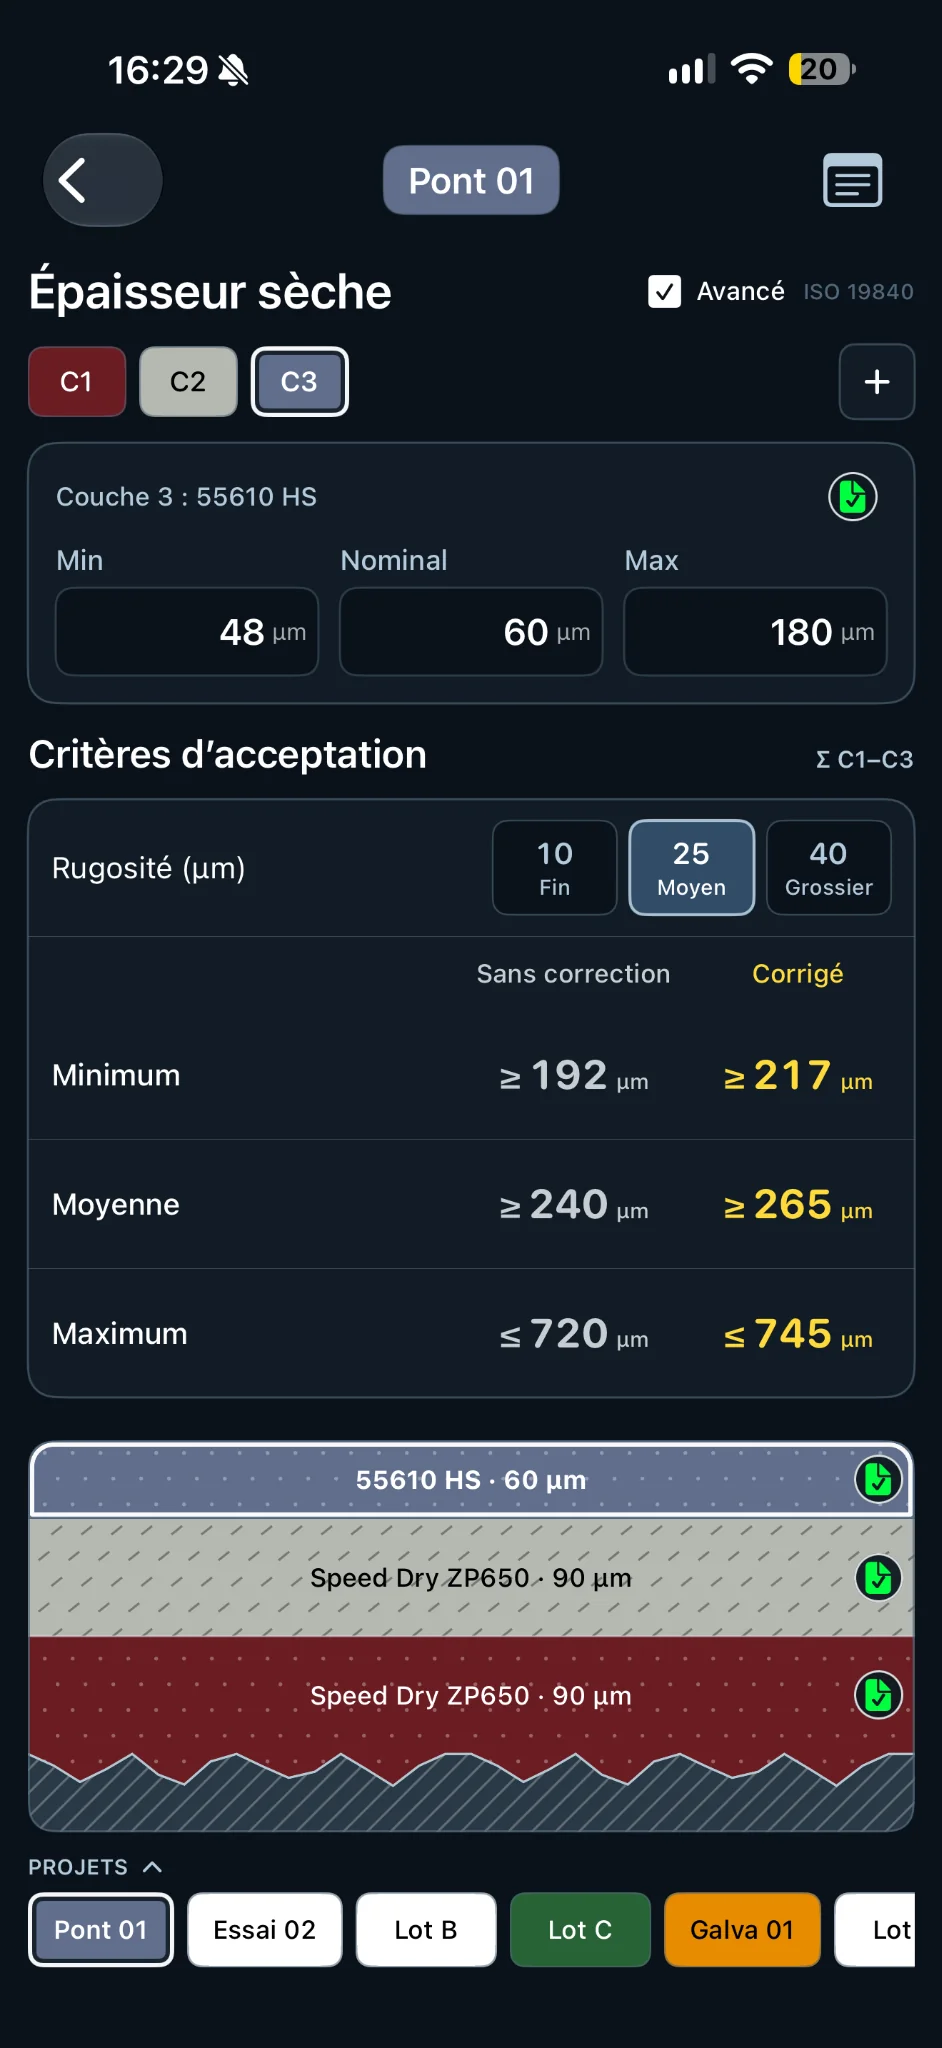
The updated screenshot shows a 240 µm nominal coating system with a 25 µm surface-profile correction. The mean threshold changes from ≥ 240 µm uncorrected to ≥ 265 µm for corrected readings. This adjustment relates to interpreting thickness measurements, not an extra paint thickness to apply.
ISO 19840 and acceptance decisions
ISO 19840 addresses measurement methods, inspection areas, sampling and acceptance criteria for dry-film thickness on rough surfaces. CoatKit’s limits assist inspection planning, but the displayed thresholds alone do not establish acceptance of an inspection area. Check the project specification, applicable measurement correction method, the full set of readings and all other requirements of the standard.
Manage coats without re-entry
Manage coats from their C1/C2/C3 tabs. Linked technical datasheets can also be opened from the coat panel or graphical layer stack.
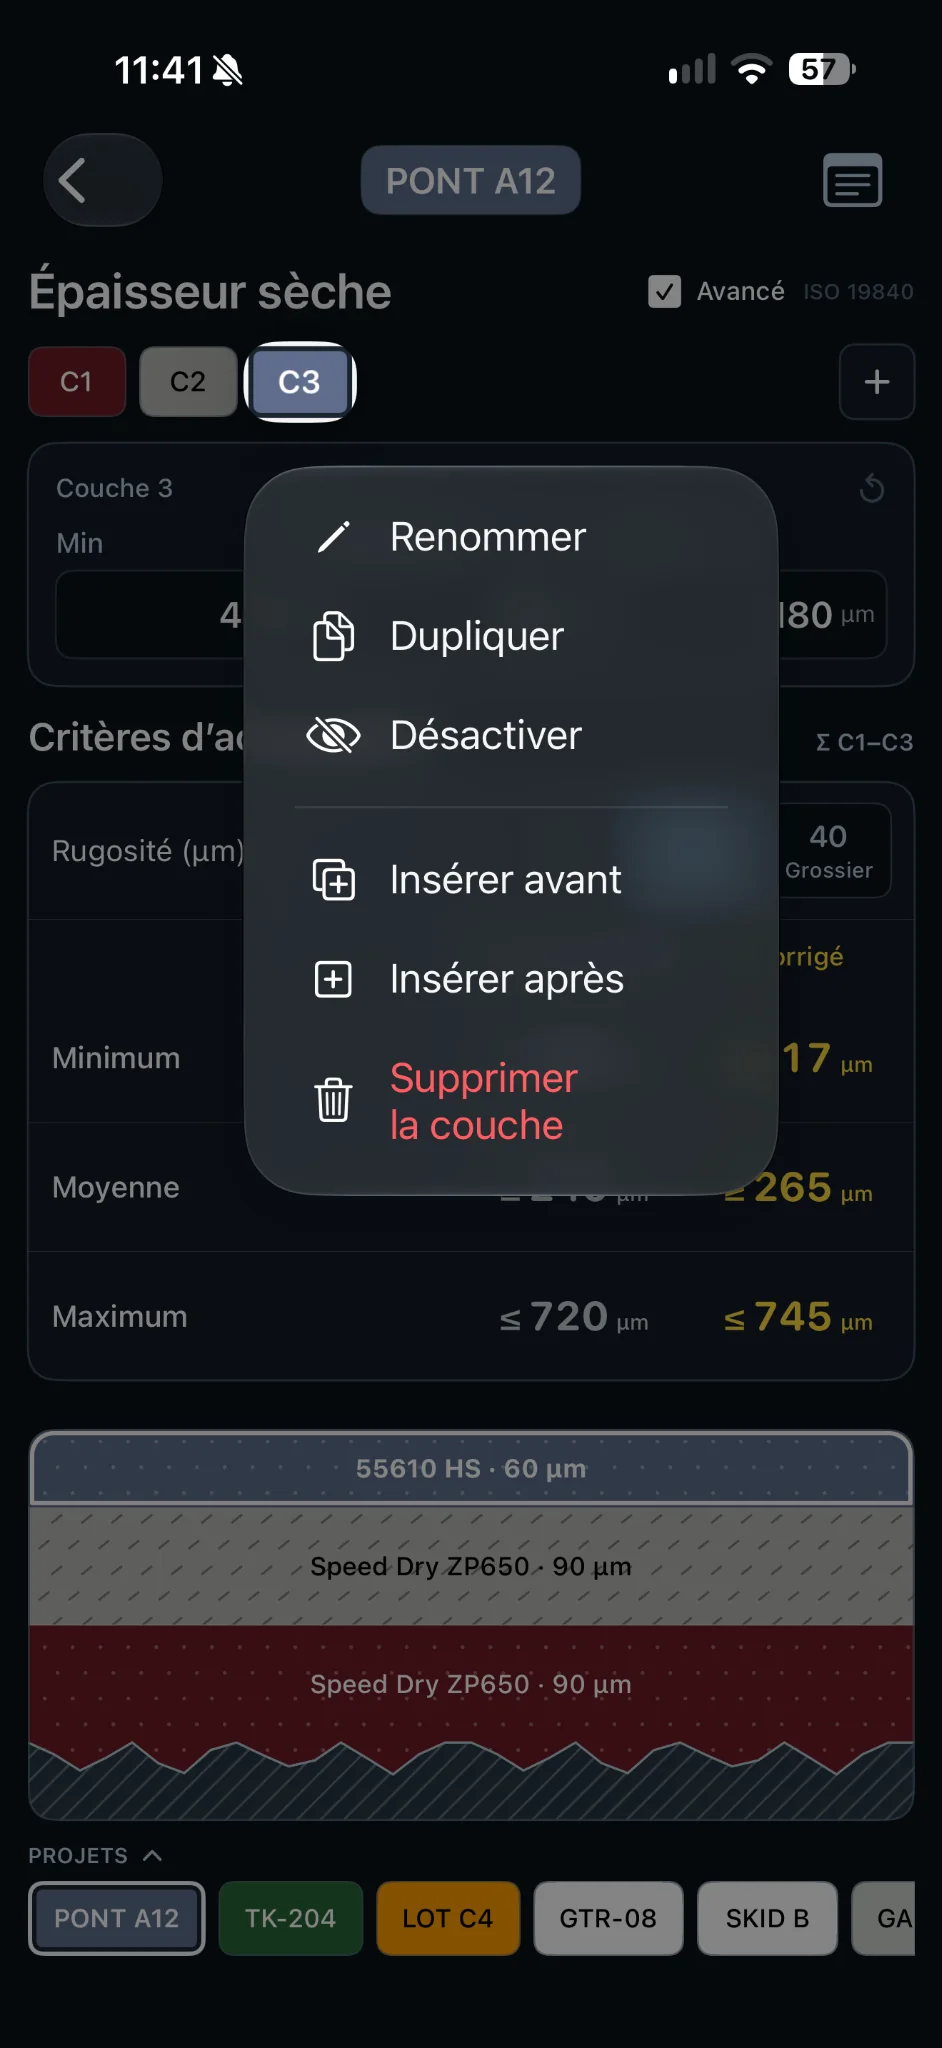
Touch and hold a coat tab to display its actions.
Rename, duplicate, insert a coat before or after, or delete it. Coat tabs are renumbered in order.
“Disable” keeps the coat in the project but excludes it from the active system until it is enabled again.
A green checked-document icon means that a PDF is linked. Tap it in the coat panel or diagram to open the reader. A grey magnifying-glass icon indicates that no document is linked and opens the association options.
Wet film thickness · WFT
Calculate theoretical wet-film thickness and estimate paint requirements. Inputs are saved per coat and can use data associated with the coat’s PDF datasheet.
Set the selected coat’s NDFT and, when relevant, its maximum DFT.
Use the manufacturer’s technical data sheet for the product’s volume solids content, then enter the proposed thinner percentage.
CoatKit calculates nominal and maximum theoretical wet-film thickness, showing the effective solids content after dilution and the selected display rounding.
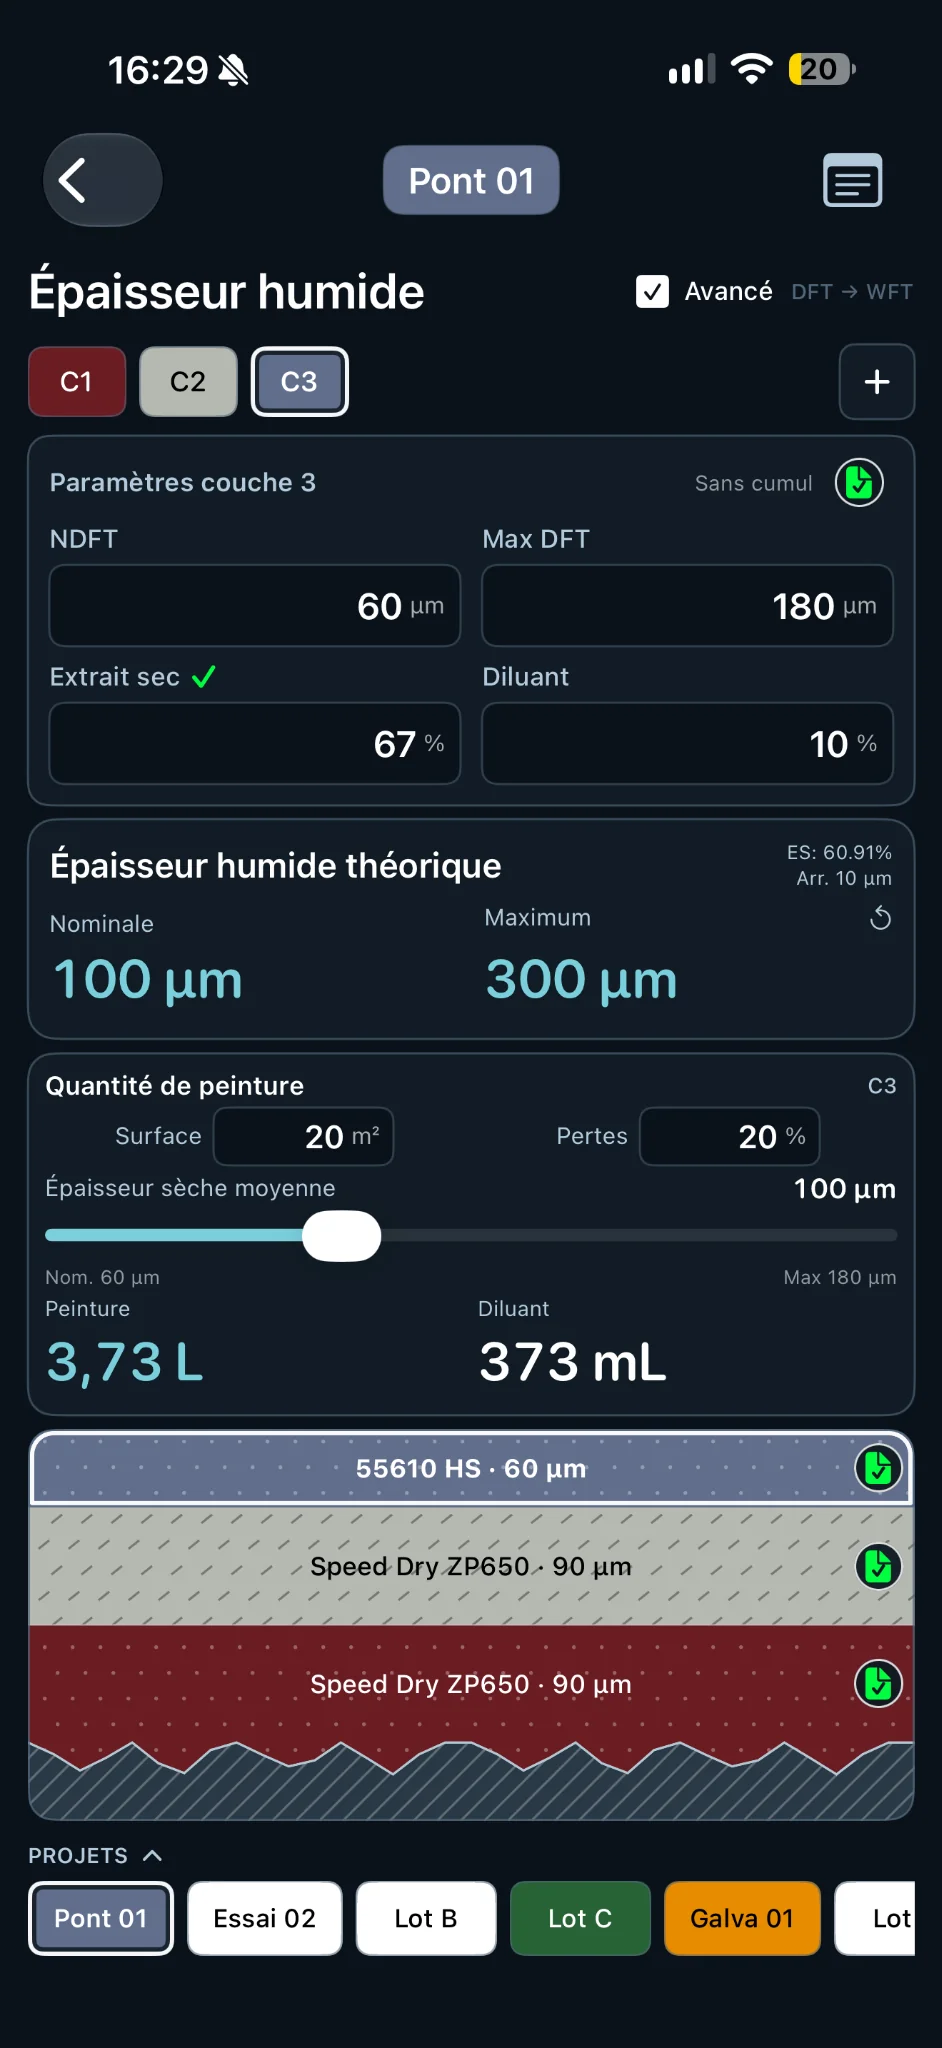
For 67% volume solids and 10% thinner added by paint volume, effective solids become 60.91%. With a target 60 µm DFT, the displayed nominal WFT is 100 µm after rounding to 10 µm (illustrated maximum: 300 µm for 180 µm DFT).
WFT calculation
Volume solids after thinning = original solids ÷ (1 + thinner ratio)
WFT (µm) = DFT (µm) ÷ (volume solids after thinning / 100)
Example: 67 ÷ 1.10 = 60.91%; 60 ÷ 0.6091 ≈ 98.5 µm, displayed as 100 µm with 10 µm rounding. Always follow the manufacturer’s data sheet and permitted thinning limits.
Paint quantity and dead volume
The WFT module also estimates coating material quantities from area and average dry film thickness.
Quantity inputs
Enter the surface area, expected losses and the average dry-film thickness using the slider between nominal and maximum DFT. CoatKit shows paint volume and the corresponding thinner quantity separately.
Updated example: 20 m² area, 20% losses, 100 µm average DFT, 67% volume solids, coat C3. The app estimates 3.73 L of paint plus 373 mL thinner at 10%.
Paint consumption and losses
The theoretical undiluted paint volume is determined from surface area, average DFT and original volume solids. Losses are included as a fraction of the total amount consumed.
Paint (L) ≈ Area × DFT(µm) ÷ (1000 × VS) ÷ (1 − loss ratio)
For coat C3: 20 × 100 ÷ (1000 × 0.67) ÷ 0.80 ≈ 3.73 L. Adding thinner at 10% of paint volume gives about 373 mL. These remain estimates; actual usage depends on application conditions, geometry and losses.
For the first coat only, CoatKit automatically includes an estimated dead volume associated with the selected substrate roughness. The on-screen label identifies the roughness class without displaying a numerical value. Dead volume is different from the ISO 19840 DFT measurement correction.
Dead-volume assumptions and values
| Selected profile | Estimated dead volume |
|---|---|
| None | 0 µm |
| Fine | 28 µm |
| Medium | 53 µm |
| Coarse | 83 µm |
The model assumes an angular grit-blasted profile, the midpoint of the Ry5 ranges of a G-type surface profile comparator, and an approximate relation dead volume ≈ 2/3 × Ry5. As a training rule of thumb, FROSIO materials also use an order-of-magnitude relation of dead volume ≈ 2 × Ra. These are calculation assumptions, not universal or standardised coefficients.
Keep observations with the project
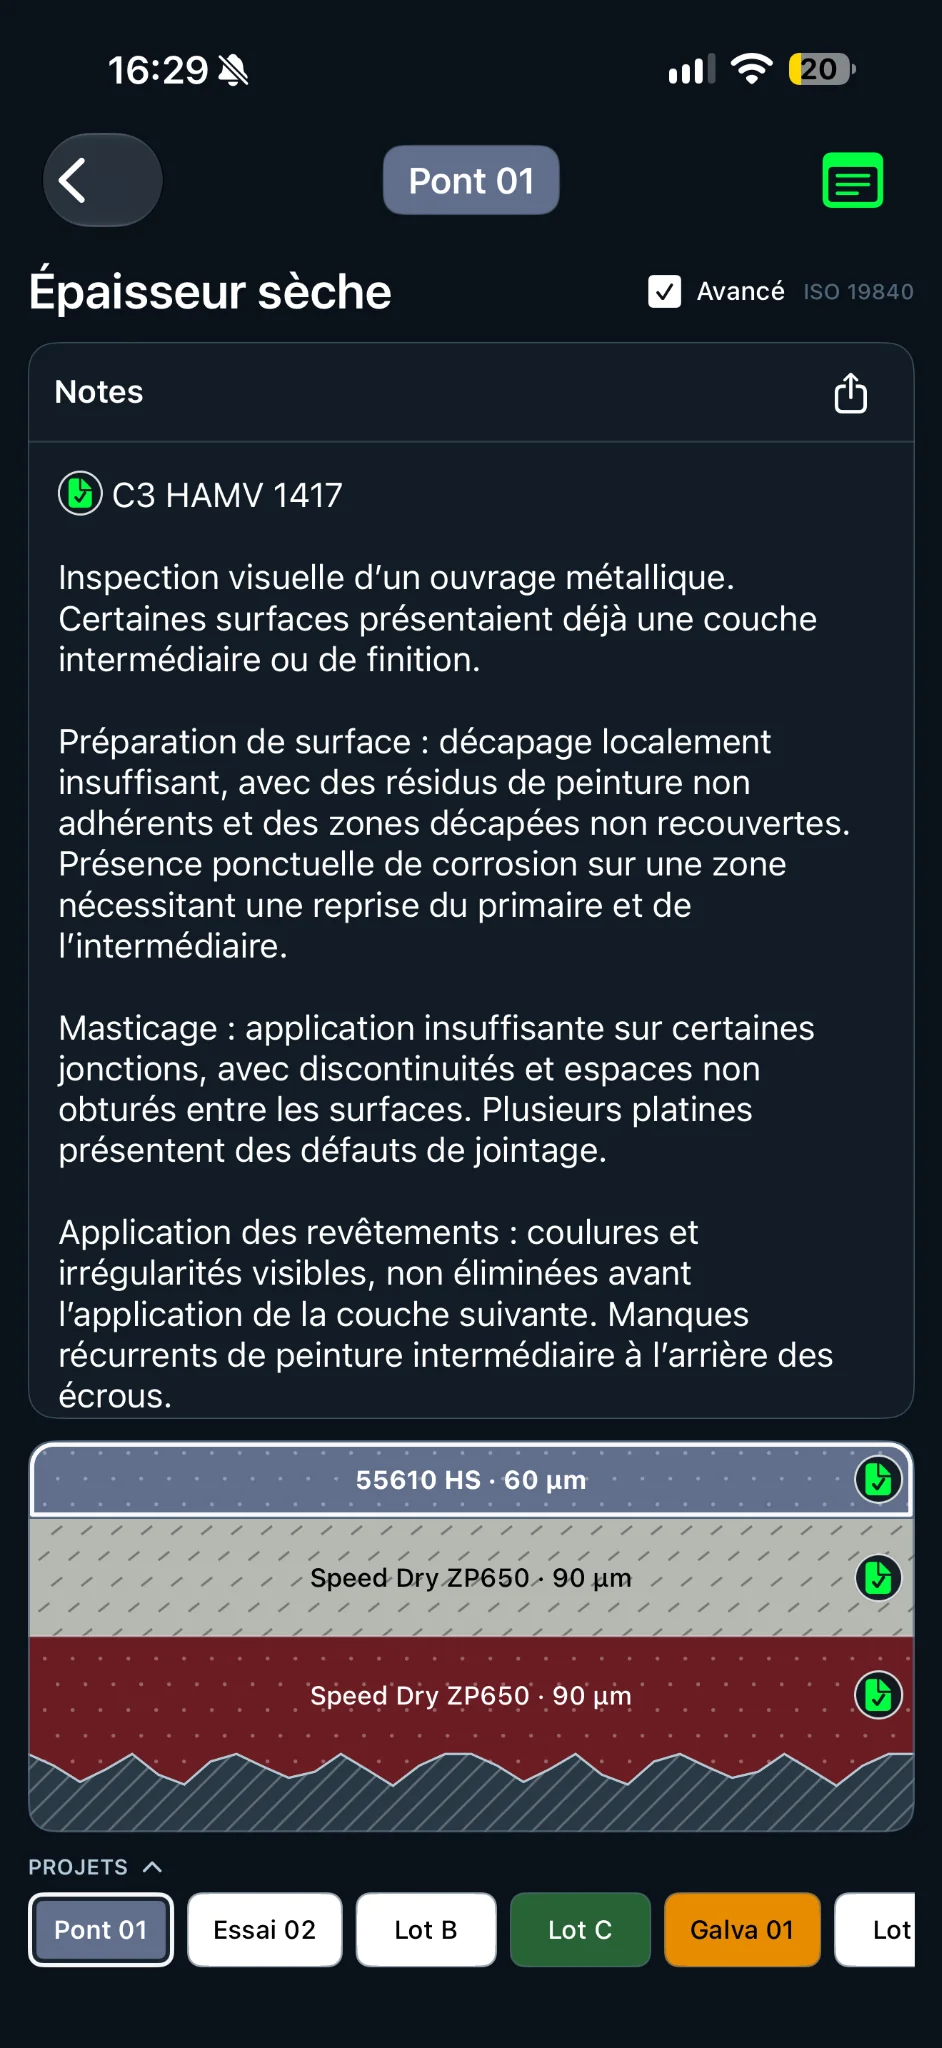
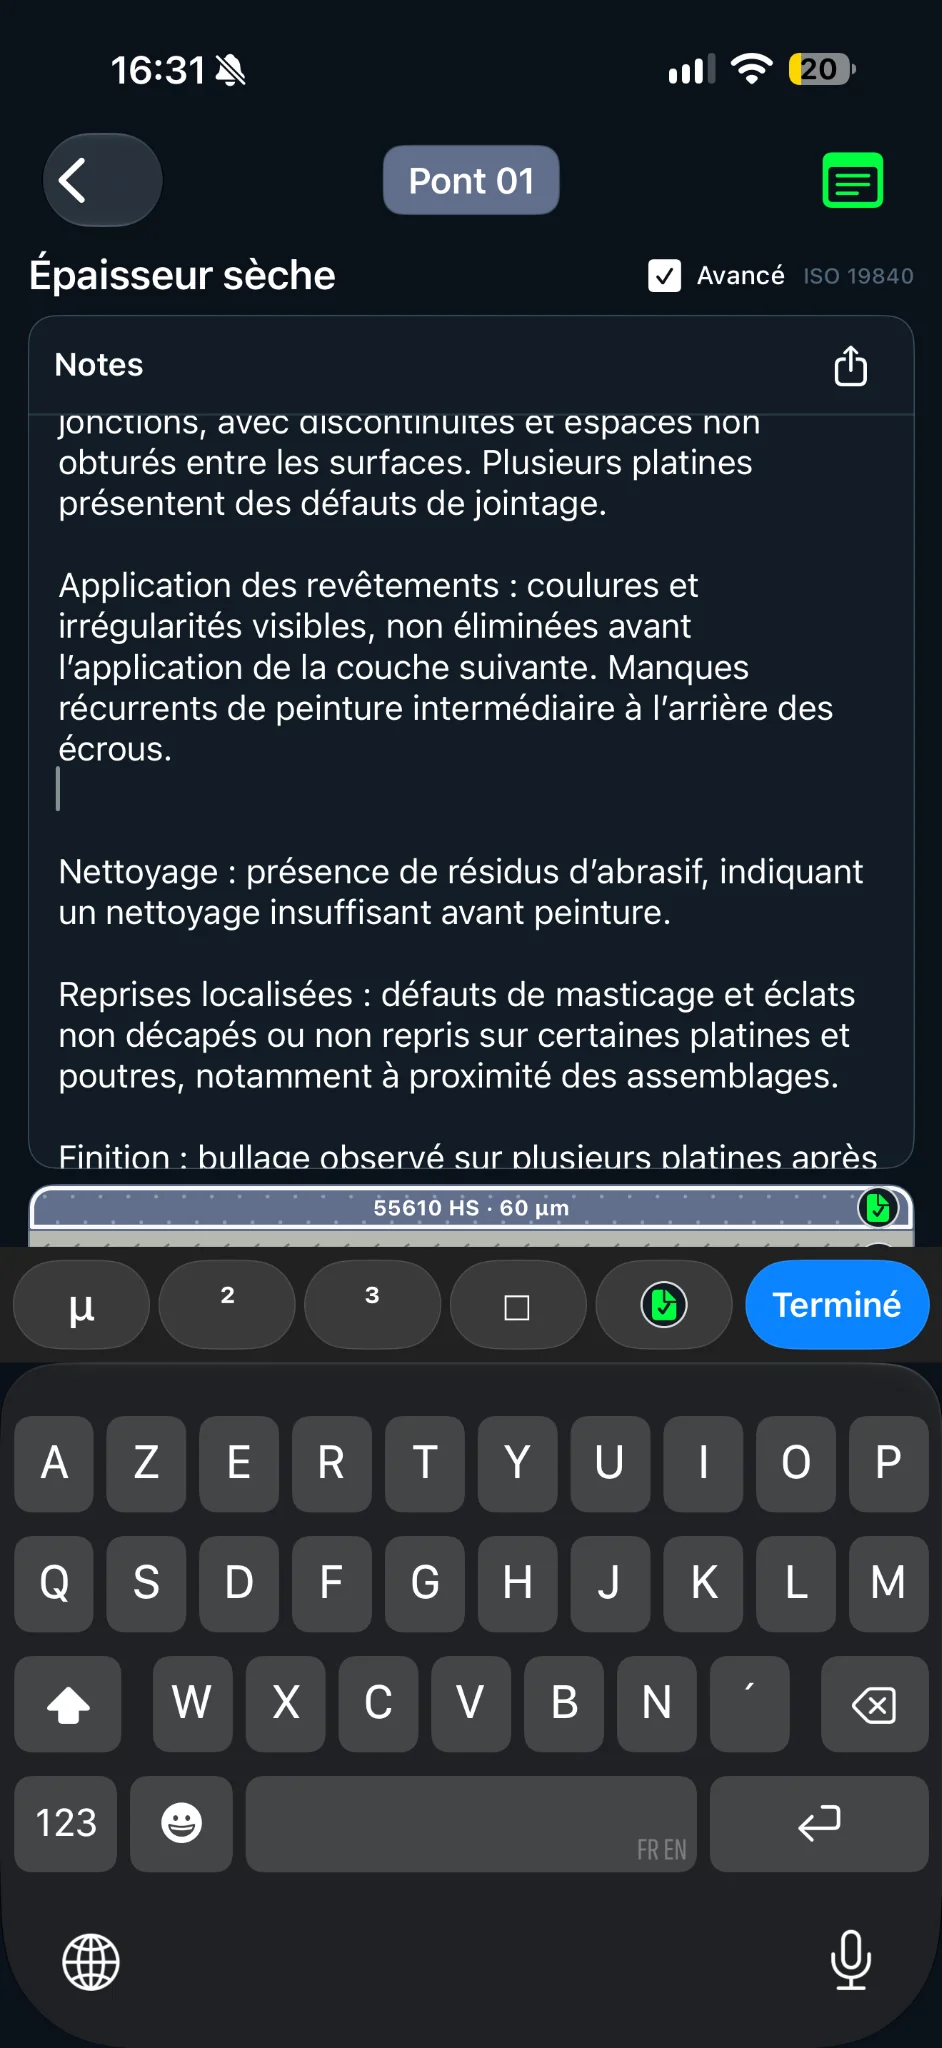
Each project note can contain plain text, checkboxes and document icons that open associated PDFs directly from the library.
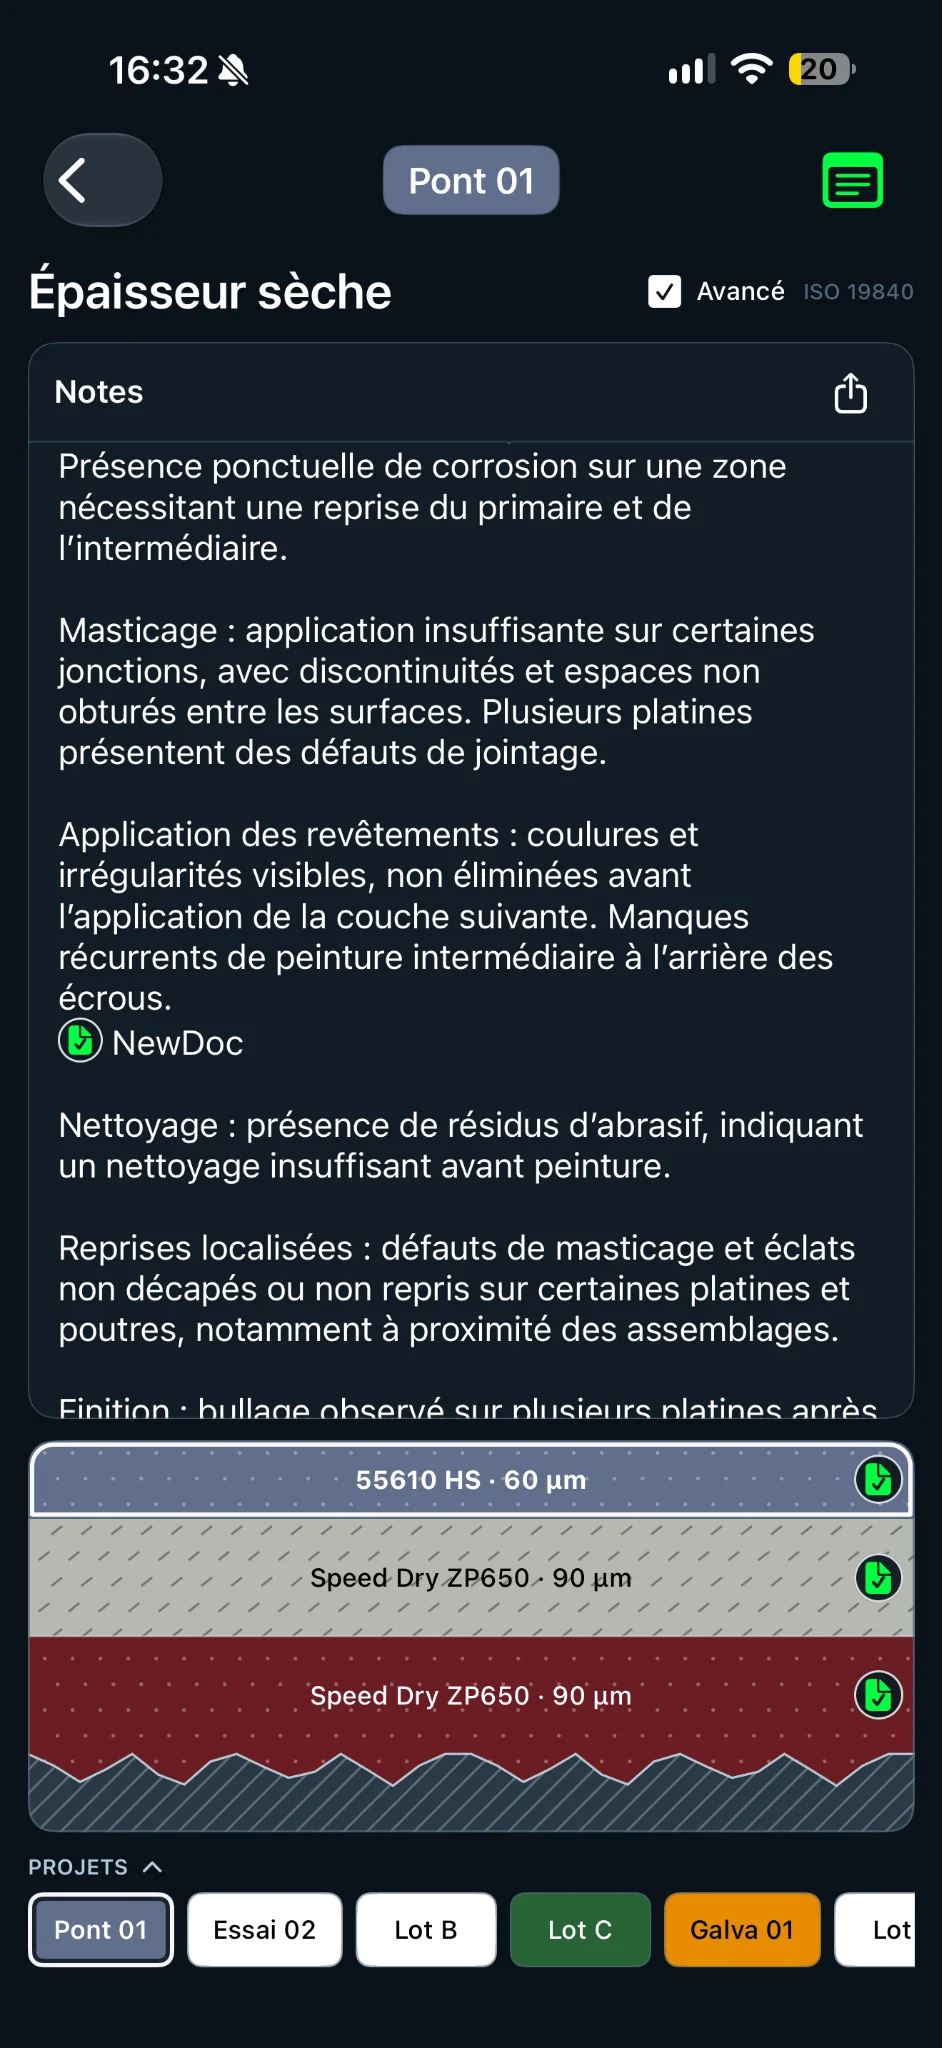
Tap the Notes icon at the top right of DFT or WFT. Notes belong to the current project; the graphical coat stack remains visible below.
While editing, use the keyboard toolbar: µ, ², ³, ☐ and the green document icon, followed by Done. A document marker is placed only at the beginning of a line after selecting a PDF from Documents. The text after it is editable.
In read-only mode, notes remain scrollable and the viewing position is restored. Tap a green document marker at the start of a line to open its PDF in the built-in reader. Checkboxes can still be toggled.
Tap the share icon to export notes as .txt or copy text using the native iOS Share sheet. PDF links are retained in CoatKit and project backups.
Each marker references the document’s internal UUID, not its filename. Renaming a PDF does not break the link; exported projects include their required documents. Permanently deleting a PDF can make its link unavailable.
PDF library and technical datasheets
The Documents module keeps inspection PDFs together: technical datasheets, specifications, procedures and reference documents.
In Safari or Files, open the iOS Share sheet and select Import into CoatKit. The file is added to the shared library, available from the home screen.
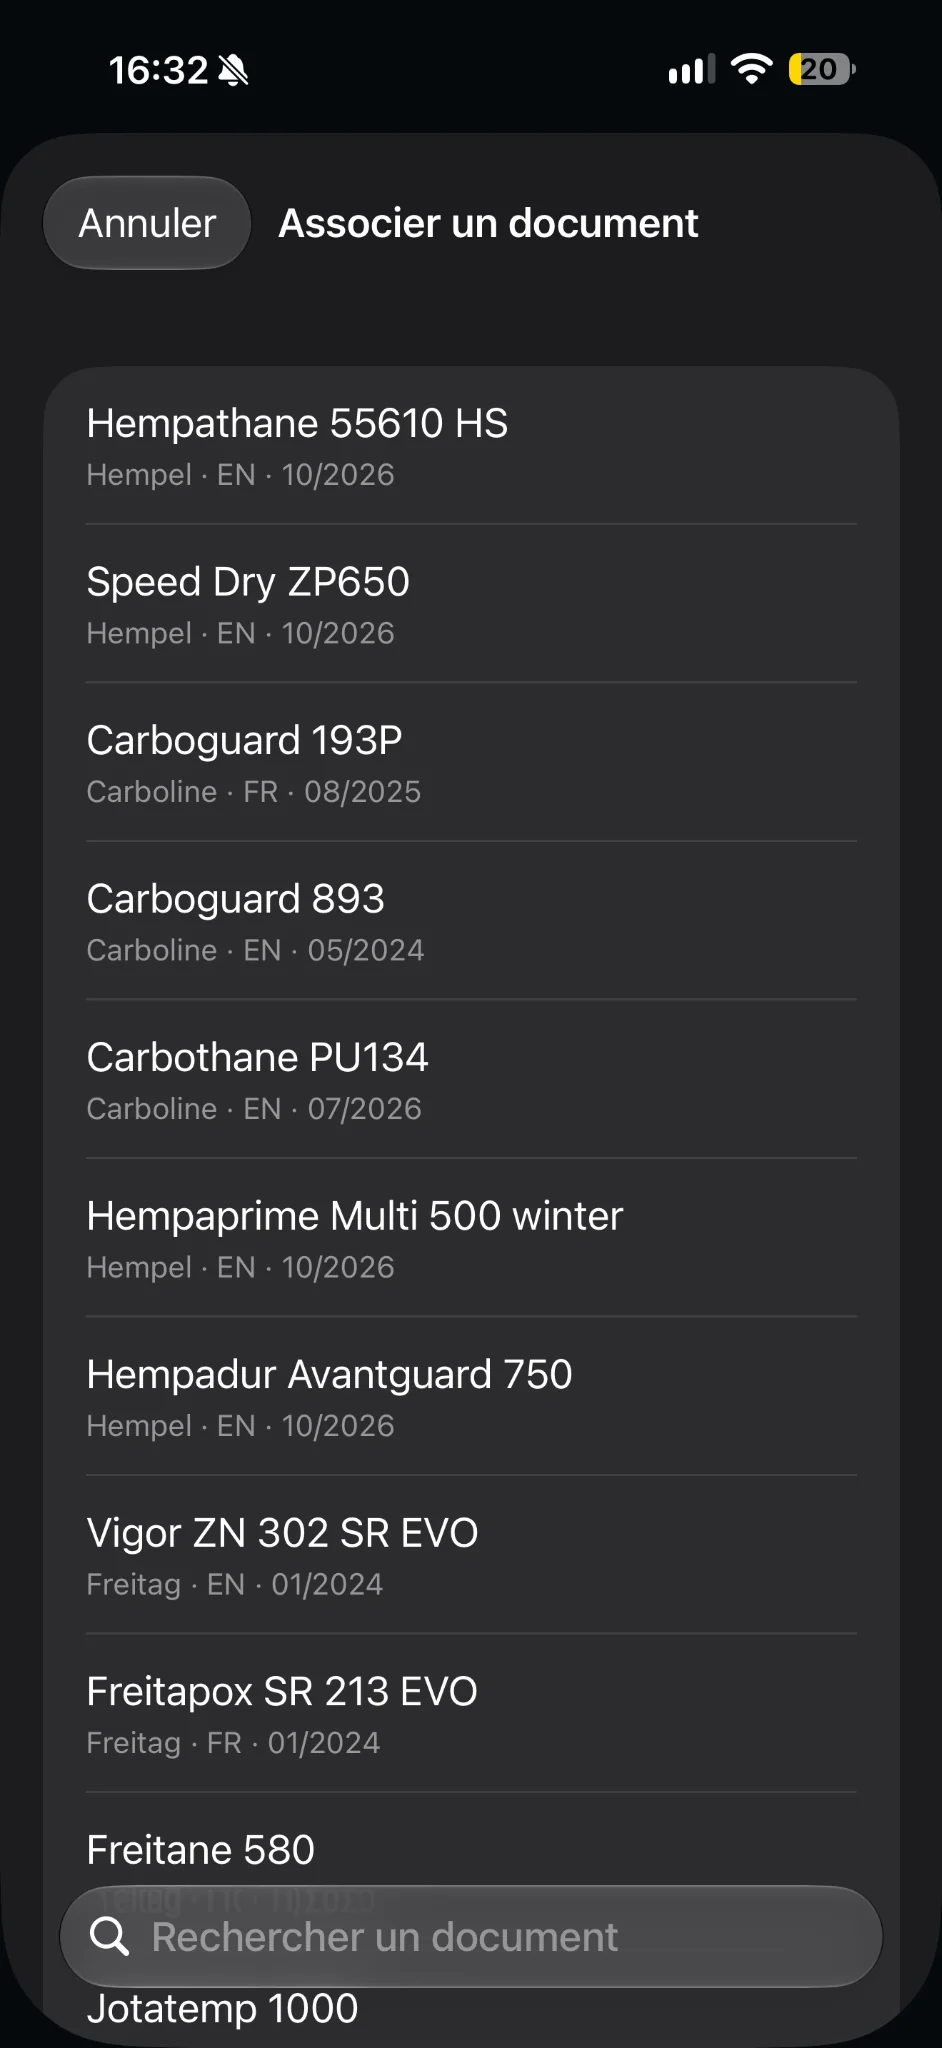
Entries can store product name, manufacturer, language and version. The “Link a document” picker lists available PDFs and provides a search field when associating a file with a coat or note.
Open a PDF in the built-in reader with zoom and scrolling. Use drawing, highlighting, text and erasing tools. Annotations are saved and remain editable when the document is reopened.
In DFT/WFT, use the grey magnifying-glass icon or coat menu to choose a technical datasheet. A green checked-document icon indicates an existing PDF link. A web search option is also available when looking for a datasheet.
When a valid volume solids value (greater than 0 and up to 100%) is entered for a coat linked to a PDF, it is shared with other coats and projects using that same document. The small green check beside the VS field indicates synchronisation, not validation of the numerical value. This information and PDF annotations are kept in the relevant exports.
A notebook beyond individual projects
The General Notes tile on the home screen stores reminders, checklists and references that are useful across different jobs.
The same editor as project notes
Use free text, checkboxes, µ, ² and ³ shortcuts, linked-document markers at the start of lines, .txt sharing and scrollable read-only mode with remembered position. A document marker can point to any PDF in the Documents library.
Project notes travel with their project in a .coatproj export. General Notes are shared across the app and included in a complete .coatkit backup, not in a single-project export.
Export or import a single project
A .coatproj file lets you transfer one complete DFT/WFT project to a colleague or another device without exporting your entire library.
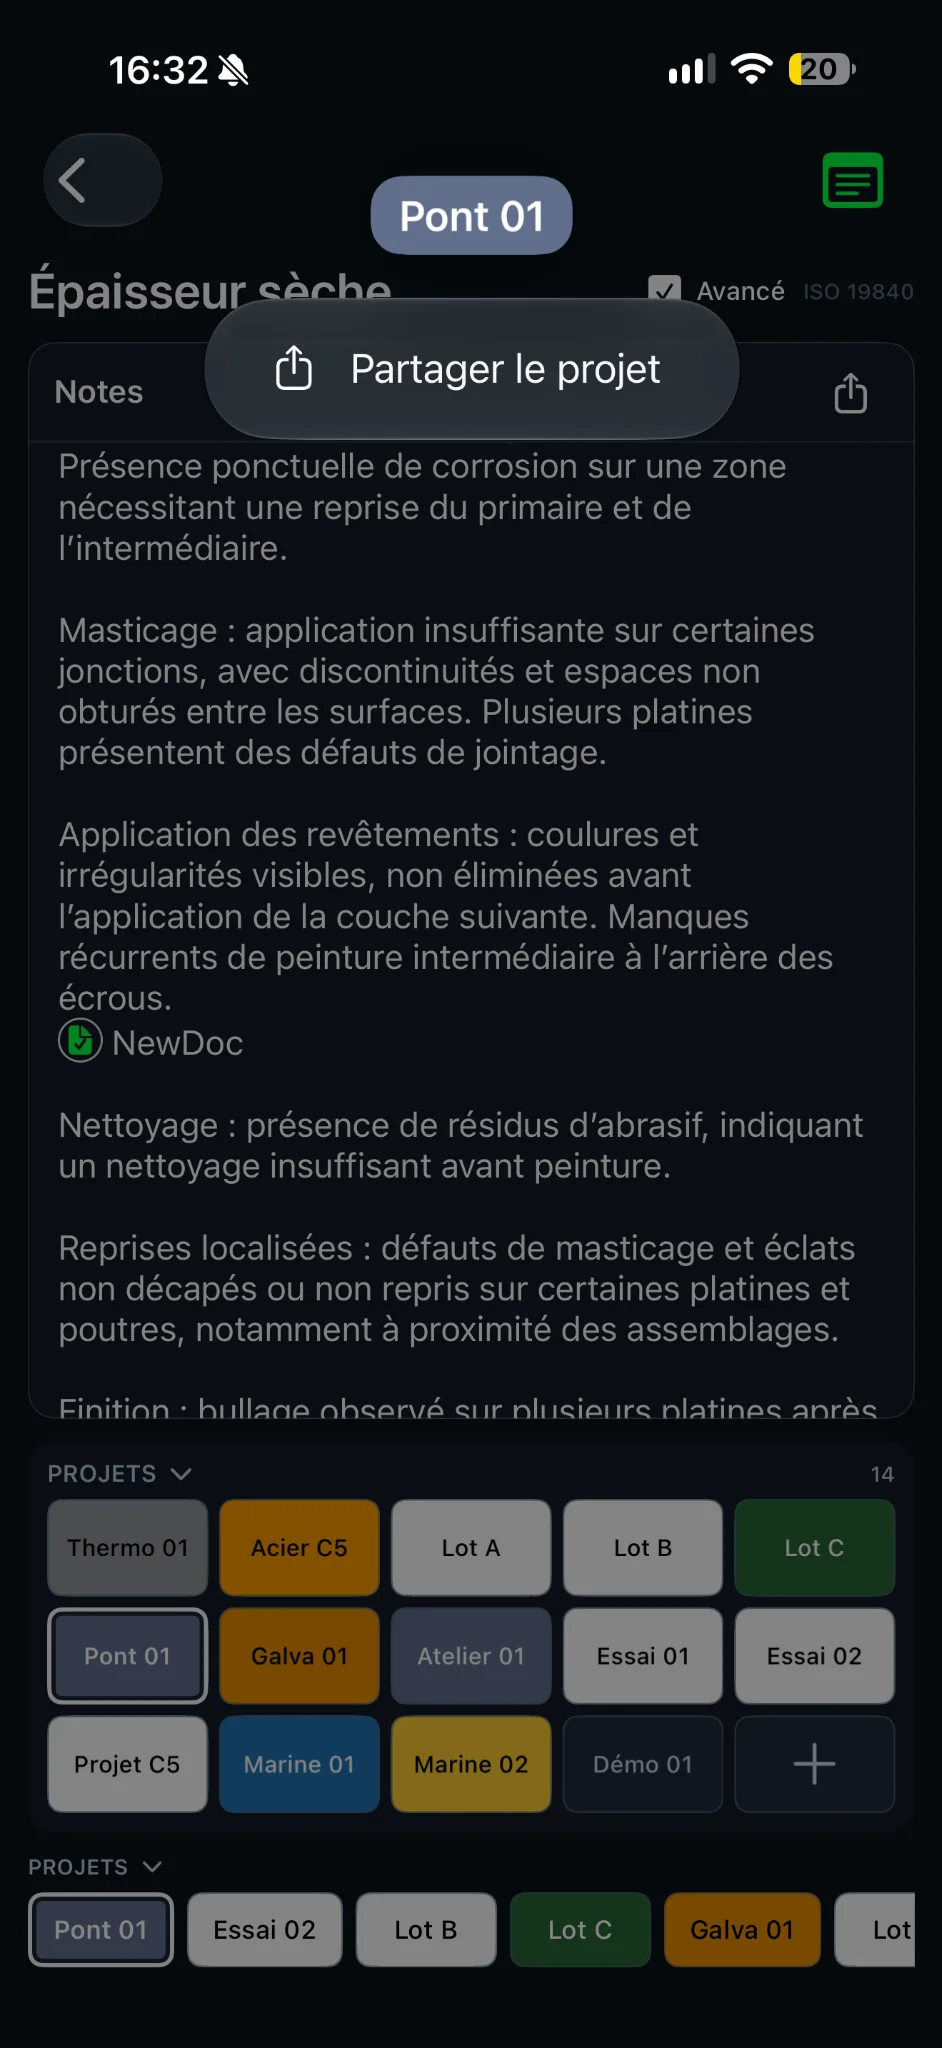
In DFT/WFT, tap the project name at the top, then choose “Share project”. You can also open the context menu for a project in the project grid.
The native iOS Share sheet lets you send the .coatproj file via AirDrop, Mail, Files or other compatible destinations.
Open the received file in Files, Mail or AirDrop, then select CoatKit from the iOS Share sheet. Single-project import is not initiated with a separate button inside CoatKit.
A project contains its coats, colours, settings, notes and linked PDFs with annotations and volume solids. Document references remain usable even if internal identifiers need remapping to avoid a clash.
.coatproj = one project plus the PDFs it needs; .coatkit = whole-app backup (projects, PDFs, annotations, associations and General Notes). Keep an original backup before major import operations.
Climatic conditions
Combine on-site readings, indicative weather data and dew-point calculations to assess conditions before coating application.
Use local conditions, choose a position on the map, or enter available site readings manually.
Relative humidity, ambient temperature, dew point, steel temperature and water-vapour content are linked by psychrometric calculations. Dependent fields update automatically.
Use the padlock icons to keep reference measurements fixed while other results are recalculated.
ΔT = substrate temperature − dew point. The app warns when this is less than 3 °C; always check the criterion required by the product and the project.
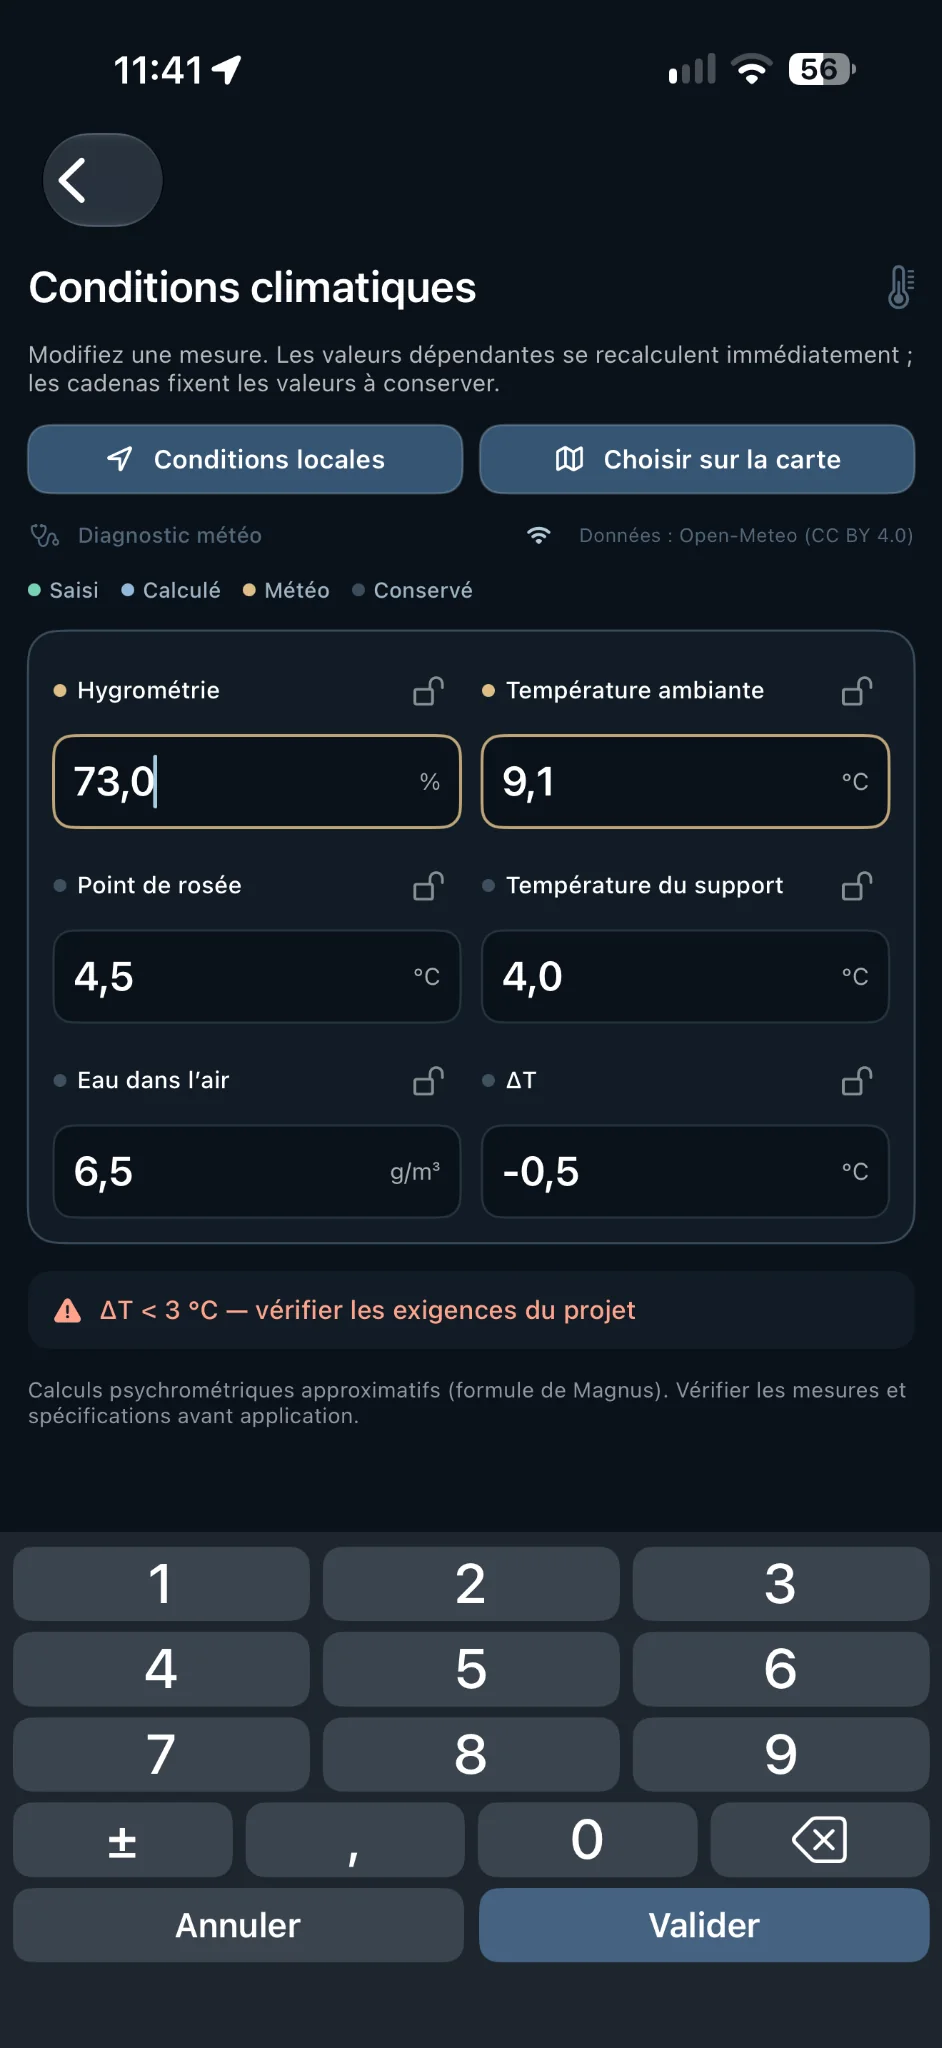
Dots identify entered, calculated, weather-derived and retained values. Results use a Magnus-type psychrometric approximation. Weather information is supplied by Open-Meteo and does not replace actual site measurements.
Mixing A:B · volume to weight
Convert a volumetric mixing ratio to quantities to weigh when the two components have different densities.
Use the manufacturer’s stated ratio for base A and hardener B.
Enter each component’s density in kg/L.
Select the required total mixed volume in mL or L. The calculator displays the masses of A and B and the resulting weight ratio.
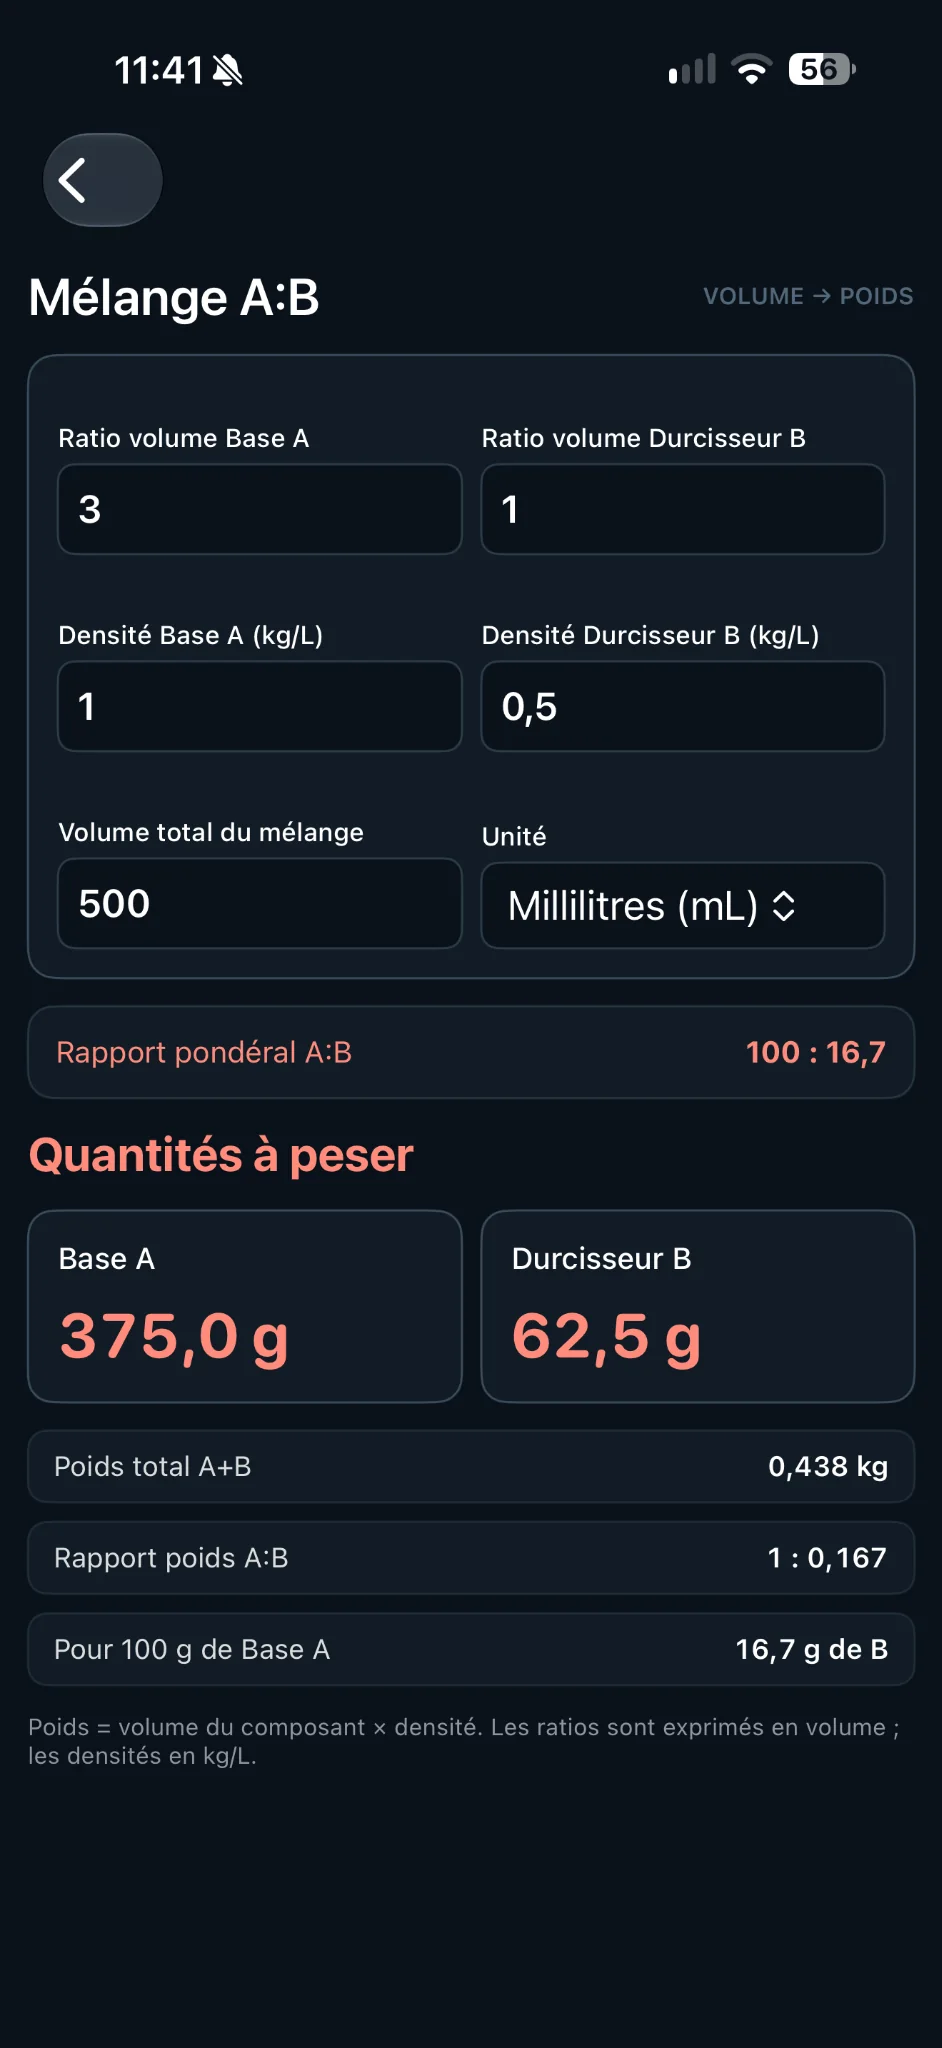
With a 3:1 volume ratio, densities of 1.0 kg/L for A and 0.5 kg/L for B, and a total mixed volume of 500 mL: weigh 375 g of A and 62.5 g of B. The corresponding weight ratio is 100:16.7. Volume ratios and weight ratios are not interchangeable.
RAL Classic colour chart
Browse colour families and quickly look up a code during an inspection.
Select the 1000–9000 family using the coloured buttons.
Enter a RAL number to reach a reference quickly.
Select a swatch to display its number, name and enlarged preview.
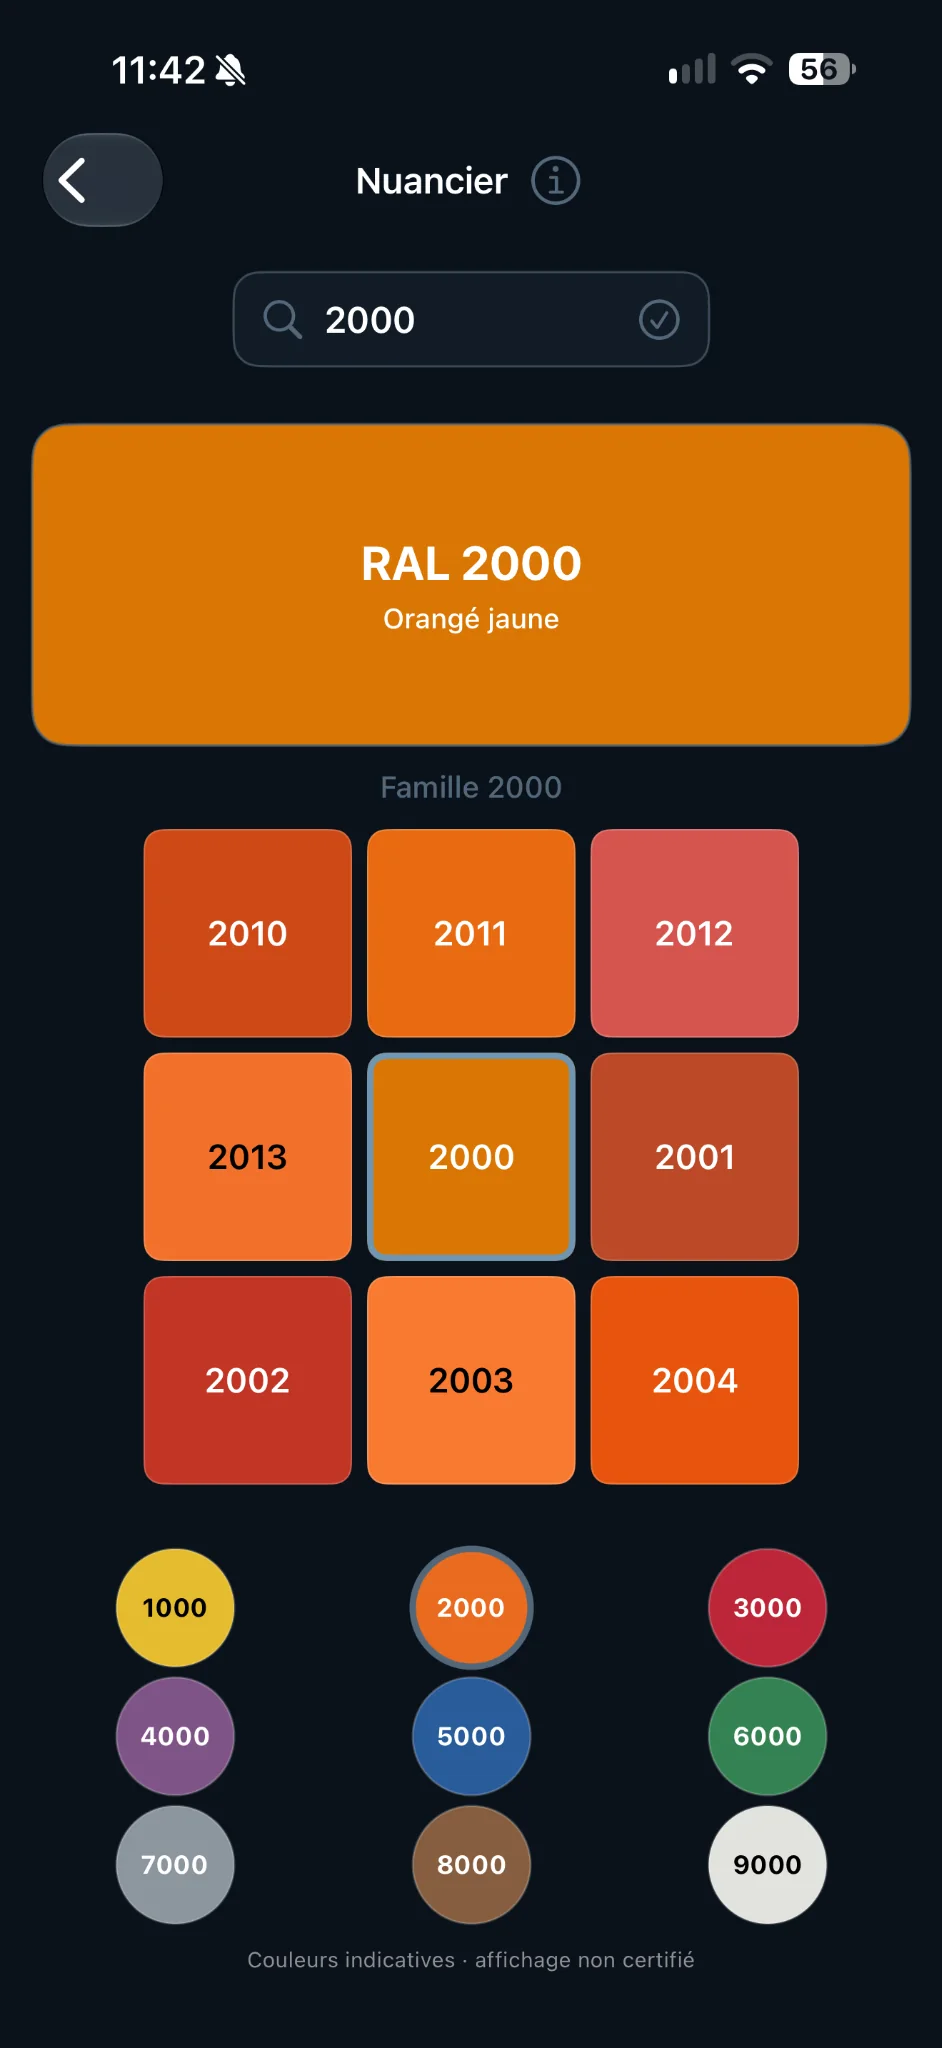
Displayed colours vary with screen calibration, brightness, illumination, gloss and viewing conditions. Digital swatches are not certified and cannot replace an official physical colour standard for acceptance decisions.
Camera and image comparison
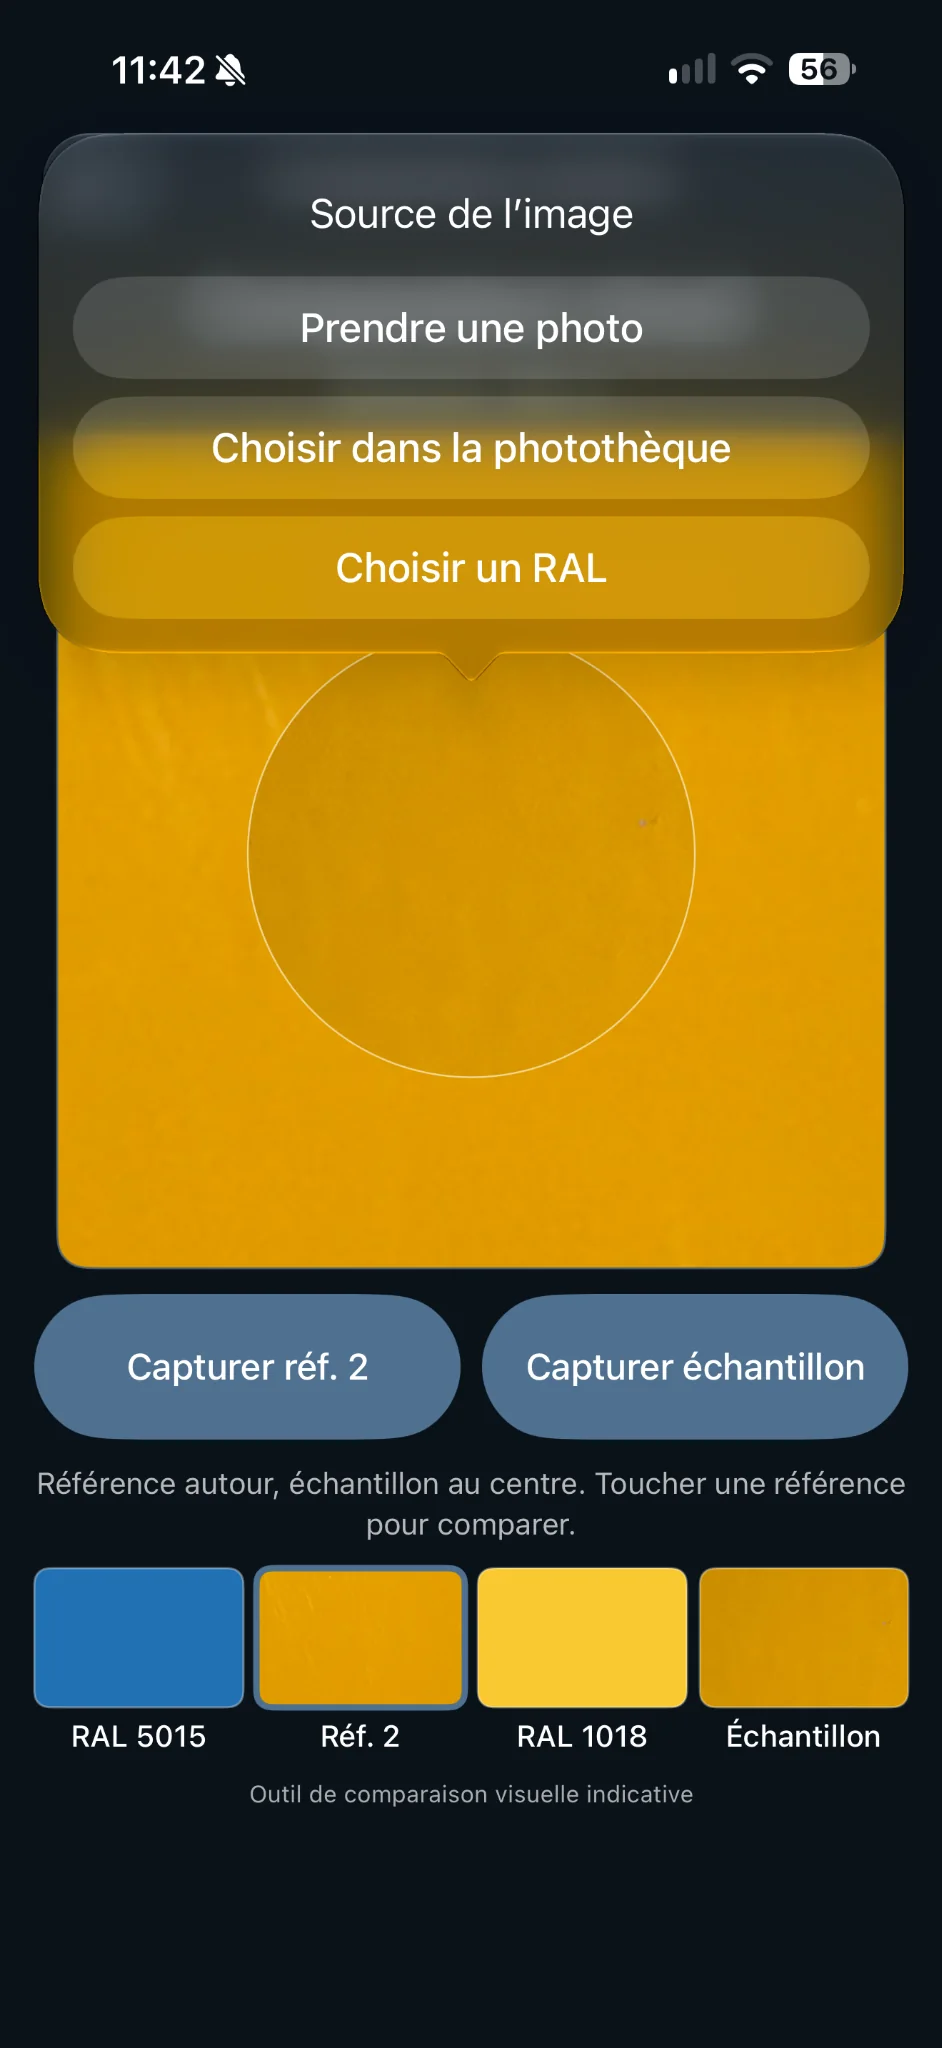
Place coating photographs and reference colours in one comparison view, with the reference outside and the sample at the centre.
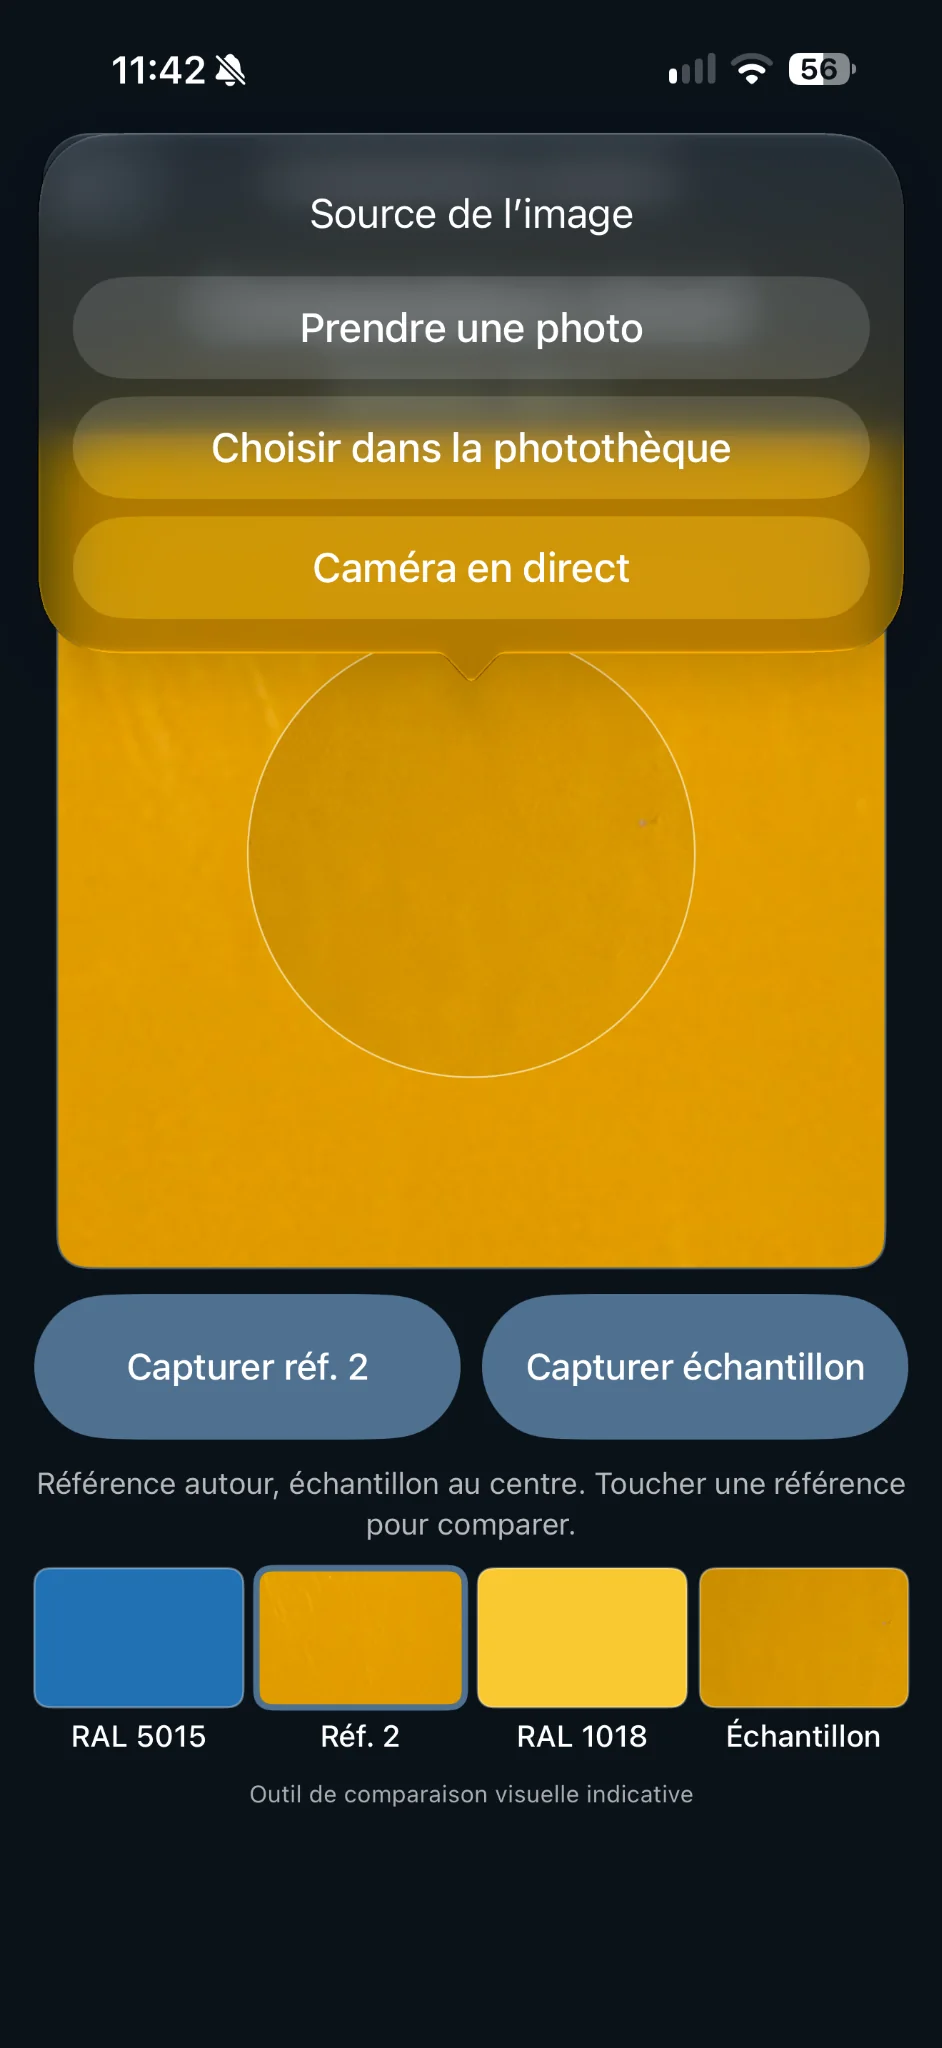
Choose references from a new photo, the photo library, a RAL swatch or live camera where available.
The sample is displayed in the centre, with reference images arranged around it.
Tap a reference thumbnail to activate it. The layout helps side-by-side visual judgement, but provides no certified colourimetric measurement.
Differences in lighting, white balance, gloss or camera angle can change the appearance significantly. Do not reject a colour based solely on the screen display. Confirm against a physical standard or appropriate measurement method.
Backups, support and exports
Use the Information screen for whole-app backups and restoration; use each project’s own menu for single-project transfers.
Open the support page and privacy policy.
For a full backup, export a .coatkit file containing projects, PDF library, annotations, General Notes and document links. Restore it using Import data on the other device. A diagnostic export is also available for troubleshooting.
Use the two links to open the developer website and this user guide.
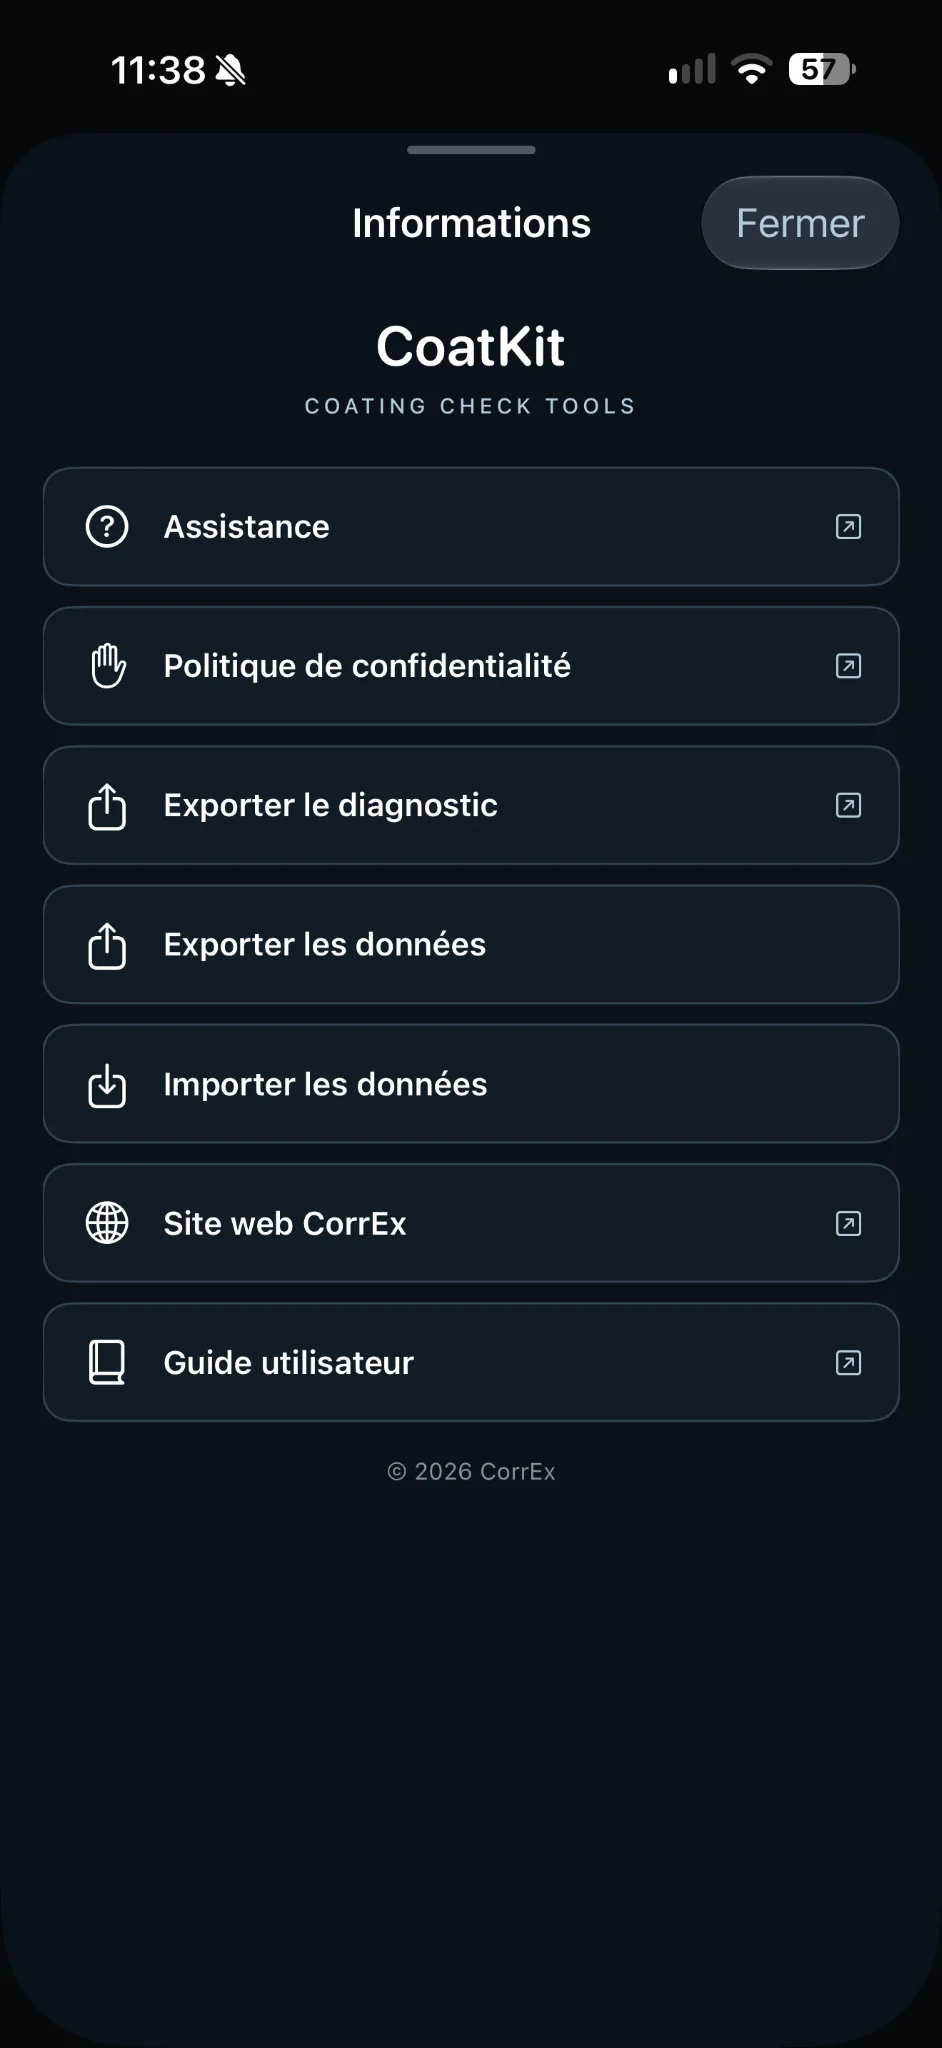
Keep your .coatkit backup in a secure location. To transfer a single project, use .coatproj in the project menu and import it through the iOS Share sheet. Devices are not automatically synchronised.
Use CoatKit as a calculation aid
CoatKit supports inspection preparation and estimates. Acceptance decisions must still be based on the applicable requirements and on measurements made with suitable instruments.
Important checks
- Thickness: compare calculated thresholds against the specification, applicable standard and actual measurements.
- Paint: use up-to-date volume solids, thinning and thickness limits from the manufacturer’s technical data sheet.
- Climate: confirm site readings and apply the manufacturer’s and project’s requirements.
- Colours: use physical standards or appropriate instruments for formal evaluation.